This post may contain affiliate links. This means if you purchase through these links, we may earn a small commission, at no extra cost to you. This helps us continue to be able to produce new content and products.
Have you thought about your table assignment vision? Or what about wedding favors? Sure, the latter isn’t as common these days, but what if you can combine the two?
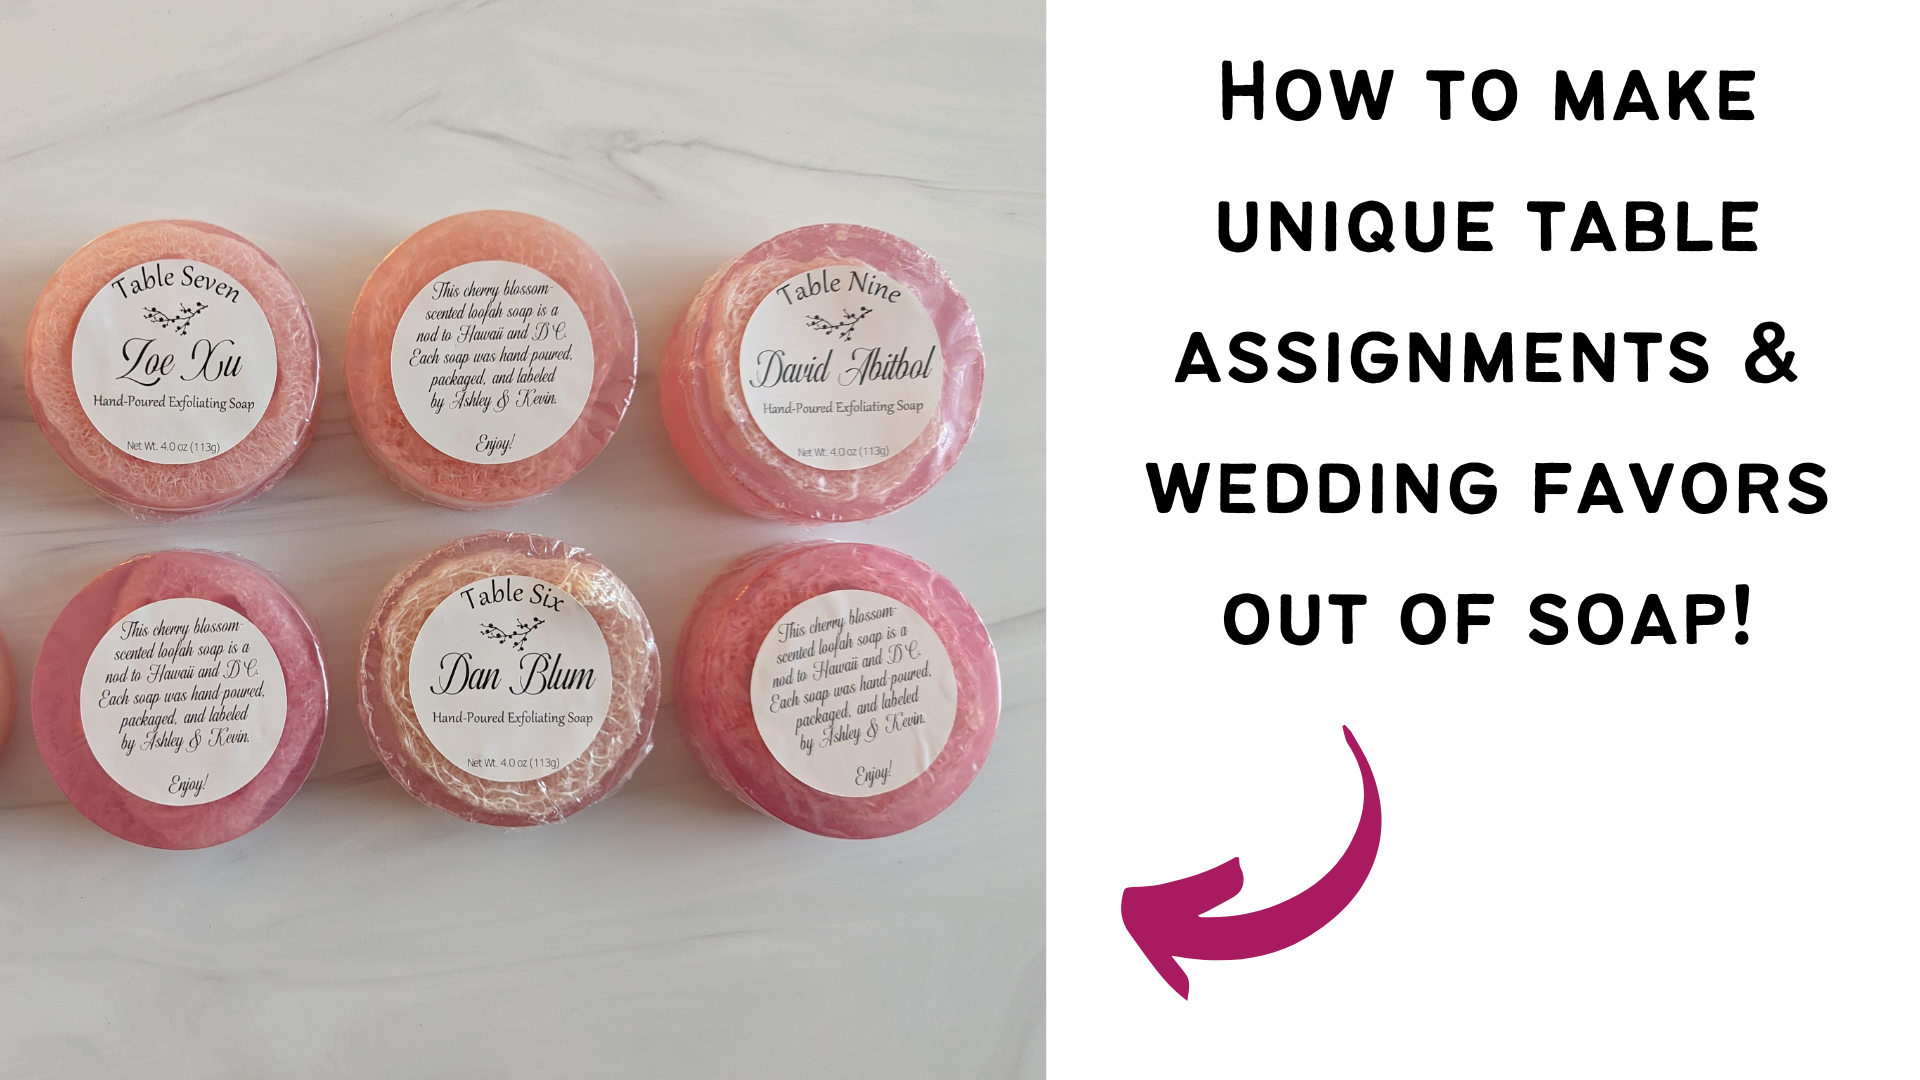
I wanted to do some different for our table assignments/favors – something that represented us as a couple and was something consumable (those are always the best favors, right?). For us, that was hand-poured soap! We even added loofah. This is something that even body wash people (like myself) can appreciate, because you can use it to exfoliate before you use your body wash. Ahhhh.
This post walks you through the steps to make the soap, shrink wrap it, and label it. The video above will give you a great visual of the process and is less than 10 minutes long.
While this is geared toward making soap for wedding table assignments, you can switch up the labels if you want to do this project for a different event. A wedding shower favor is a good one.
Table of Contents
Part 1: Making the Soap
Materials Needed
- Clear, glycerin soap base (Note – a pound of soap generates approx. 4-5 pieces of finished soap product)
- Soap Cutter (optional – you can try a kitchen knife)
- Soap Mold
- Colorant
- Fragrance or Essential Oil
- Loofah (optional)
- Glass measuring cup (at least 2 cups, but I recommend 4 cups if you have a lot of guests. The process will go by much quicker that way!)
- Double Boiler (optional – you can melt in the microwave in your measuring cup if you prefer)
- Silicone spatula
- Gloves
- Infrared thermometer (optional – you can wait a few minutes for soap to cool without being exact)
- 99% isopropyl alcohol
Product Recommendations
Steps for Melt & Pour Soap
- Get your mold ready. If you are using loofahs, ensure they are cut and placed into the mold cavities. Make sure there is no dust or debris in the mold.
- Cut your soap base into 1-inch cubes. Wear gloves and use a cutting board.
- Measure out your soap. A two-cup measuring cup should have no more than 1 pound of soap.
- Melt your soap using a double boiler on the stove or in a glass measuring cup in the microwave.
- Double Boiler – Use about 1/4c or 1/2c of water in the lower pot, depending on how much soap you are melting.
- Microwave – heat in 15-20 second increments, don’t burn it!
- When melted, pour soap back into measuring cup if not heated in microwave.
- Let cool until it’s 140 degrees F or below (keep stirring so it doesn’t solidify). This is where you can use the infrared thermometer to check the temperature.
- Add your fragrance. Be sure to follow the fragrance’s guidelines on how much to put in. You don’t want to overpower it.
- Add your colorant. A little goes a long way. No more than 3 drops max.
- Stir together.
- Pour into molds.
- Spray isopropyl alcohol on top to release any surface bubbles.
- Let sit for at least 6 hours or overnight.
Part 2: Shrink Wrapping & Labeling the Soap
Materials Needed
- Shrink wrapping bags
- Heat gun or embossing gun
- Impulse sealer
- Labels
Product Recommendations
Highly recommend an impulse sealer for this process because it will make shrink wrapping so much easier! There are other applications around the house for which you may use it, such as to seal leftover food, teas, candies, or sealing favors for different occasions.
Steps for Shrink Wrapping & Labeling
- Carefully de-mold soap once it is cured/hardened sufficiently. Place one soap in a shrink wrapping bag.
- Repeat until all soaps are bagged.
- Seal all bags with impulse sealer on two sides. Make sure the unsealed edges are removed. Keeping it just at the “red” temperature setting will allow you to easily rip off the excess when you tear it away.
- Use a scissor to cut a small hole in one of the corners of the bag if the air isn’t releasing.
- Design your labels and get them printed/cut.
- Use a die-cutting machine to DIY (print & cut) or use a website like Vistaprint.
- Note – You won’t be able to print your front labels until your table assignments are complete.
- Affix your labels and you’re ready to go!
And there you have it! Let me know if you have any questions in the comments below. If you did this project, I’d love to see how it turned out! Be sure to tag us on socials. 🙂


